Showing posts with label Weather. Show all posts

Wednesday, May 13, 2020

10 Easy Steps to a Dry Basement and Water-Tight House

Rain, rain go away!  
Rain is coming and a lot of it, St. Louis... tis the season of the WET BASEMENT, friends!

As far as area properties go, our current local forecast has the ability to turn even the most dry basement into a wet one as there is nowhere for all of this water to go?! Trickles, drips, streams, and in the worst scenario INCHES= extreme stress and costly repair for Homeowners.


Over 18+ years of building inspections as a St. Louis Realtor, one thing I know to be true: a large percentage of water damage is preventable. Deferred maintenance, red flags ignored, defects like cracks in the foundation brushed off, or water allowed to pool at a foundation or penetrate, one way or another, will eventually cause water damage.


I can assure you from personal experience that water is a property's worst enemy.  In a very short period of time, water can cause massive and permanent structural damage in the form of mold/ rot/ foundation cracks, not to mention unnecessary Homeowner stress and damage to personal property.

Do you fear water penetrating your house this week?  Is that an issue that you tend to have?  Don't just sit back and stress. Protect your investment!  Pop on a raincoat and proactively make your way through this basic checklist to help troubleshoot and reduce the damage.  

1)  Clear Gutters of All Obstructions

Is water spilling over the edges of your gutter?  Is water spraying with force at the gutter seams? Is water not coming out of the downspout?  Are your gutters pulling away from the house due to weight?  Is your siding or fascia peeling or showing wear up near the gutter?  Most likely, you have a clog and need to clear it ASAP!

Plain and simple, if your gutters are not working correctly, your basement will likely LEAK. Clearing all Spring debris or squirrels nests allows water to flow freely, ensuring the excess water gets where it should be instead of sitting at your foundation where it can potentially pool below ground.


2) Place Splash Blocks Beneath The Downspouts


Splash blocks direct rain water away from the foundation of the home and prevent soil erosion, ensuring the critical soil at the base of your foundation remain compact and as dry as possible.  At just $10-$15 a piece, splash blocks are one of the most cost effective and simple water solutions a Homeowner has access to.  Make sure that you install it correctly, not backwards, or it will flow right back towards your foundation defeating the purpose.  This is more common than you think!


3)  Ensure Downspouts Direct Away From The Foundation. 


Are your gutters clear and you have a splash block, yet water continues to pool near the foundation? Quick fix ...


... a $10 downspout extender from a hardware store.  It slips right on the end of the gutter and will immediately give you enough length to get the water AWAY from the foundation.   These inexpensive contraptions allow water to be dispersed far from your home foundation, so it will absorb into the top soil evenly.


Temporarily, place them per above... it will do the trick!  They can also be buried for a more aesthetically pleasing solution.  If you have this system in place and you are still getting water, you likely have a breach- major clog or a break in the pipe.  Temporarily disconnect the gutter from the buried pipe and redirect the water until you have sunny skies to excavate and repair!


4) Clear All Exterior Drains


If I had a dollar for every clogged driveway drain that I have witnessed cause active garage flooding or basement stairwell drain covered in leaves allowing water to flow right into the basement... I would be one wealthy Realtor.


Common sense: drains are there for a reason!  Get in the habit of keeping all exterior and landscape drains clear of debris.  If you don't, you are compromising your structure by inviting water right in.


5) Ensure That Your Sump Pump Hasn't Failed.

A sump pump is typically installed in a property with a high ground water table to avoid likely water penetration. They are also commonplace in most Midwest new construction properties.  When the water table rises, the system is activated and quickly pumps water away via a drain pump trench dug around the structure foundation. Unfortunately, sometimes they fail which can cause a flooding catastrophe!

Power failure is the most common culprit, as sump pumps are hardwired and run on electricity.  In that case, a backup generator is a quick and easy purchase at a hardware store, easily justified by the threat of a severely flooded basement.  If the electricity is on and you STILL have pump failure, this article will help you troubleshoot!  If your basement takes on a lot of water and often, a sump pump is a worthwhile solution as long as you commit to regular maintenance and testing.  However, installation of a sump system is futile unless done in conjunction with the other steps in this blog post.  A pump can only do so much.


Personal opinion:  Do not invest in a sump pump unless you are willing to invest in a backup generator, as well.  It is necessary.  In addition,  I have learned over the years that sump pumps are typically an automatic exclusion on most insurance policies, and require additional policy to provide failure coverage. If you have a sump pump, inquire with your insurance agent about adding a sump pump policy ASAP.  If you don't and your pump fails causing property damage... it will result in out-of-pocket expense.


6) Ensure Basement Window Wells Are Not Taking On Water

Basement window wells serve a purpose, but if taking on water... they are a red carpet welcome for water into the basement.  The 1st five items on this checklist could EASILY be causing the problem so start there.  If your basement window wells are clean and still leaking after checking 1-5, it likely comes down to 1 of 4 things:

A) You need to caulk and seal the windows.

B) You have a grading issue that needs addressing ASAP(see #10)
C) You need a well cover, ala THIS, to help redirect rainfall if the window isn't located safely under the protection of the eaves.
D) You have cracks in the foundation near the windows that need to be addressed by a professional foundation company.

7)  Ensure the Service Pipes And Wires Leading Into the House Are Tight And Sealed.


Electric, cable, gas, telephone, and plumbing services are all fed to your property via service wires and pipes coming through the structure.  Ensure the boxes and meters aren't loose.  Ensure the openings are properly caulked and sealed around the service entry to ensure that water doesn't penetrate.  The most common and SCARY one that I see at inspection regularly?  Electric panels with interior rust, as water droplets directly enter the box via beading on the entry wire.


Water + electricity= disaster.


In general, caulk and weather stripping in a Homeowner's best friend in ANY area of their house where they feel draft or see light.


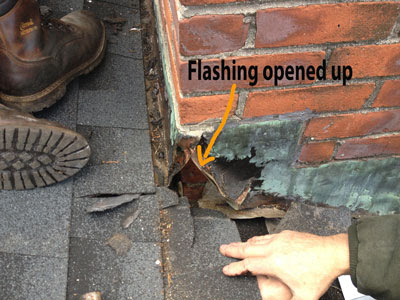
8) Ensure your Roof Shingles and Flashings Are Secure And In Good Condition


Simply, a well-maintained roof is a property's most important defense against water.  Deferred maintenance is a huge no-no.  A teeny leak can result in severe structural damage in the matter of minutes.   Check your roof regularly.  Upon the VERY first sign of water penetration, contact a professional ASAP.


DO NOT PUT THIS ONE OFF.


9) Check Your Chimney


To ensure that a chimney doesn't leak, it should be properly maintained.  If it isn't properly maintained, it is the most common water entry point on the roof.  If the cap is missing or damaged, replace/tighten it.  If the crown is cracked, caulk it or have it replaced by a professional.  If moisture is seeping in, the bricks may need tuck-pointing.  Per flashing, see #8.


10) Ensure That The Soil Is Properly Graded AWAY From The Foundation.


Obviously, this is not something that can be address MID-STORM, but often times water issues in the Midwest come down to grading.  If you have any low areas where water is able to pool at the foundation, you have trouble! Ideally, your yard grade should be sloped away from the house, as water flowing towards the home almost always causes issue.


I discuss grading with my clients regularly, pertaining to water drainage issues. Sloping the soil away from the foundation will remedy a wet basement most of the time.  The Family Handyman recommends firmly packing clay soil around the foundation, with at least a 4-in. slope over the first 4 ft. Place 6-mil black plastic over the soil and cover it with landscape rock...


Whatever method you choose to regrade your foundation beds, should you see any pooling it isn't working and it is time for a redo!

The key to successful home maintenance is proactivity.  Deferred maintenance always comes back to bite a Homeowner during wicked weather systems like this.  Hopefully these tips will get you through this particular storm system.  Once sunny skies return, however, proactively troubleshoot the areas that were compromised during the storm to prevent future water penetration.


Wednesday, October 9, 2019

Pretty in pink!

Seen the projected local St. Louis weekend forecast yet? 
I am filling every vase in my house with the last gorgeous blooms of Summer, before they are taken by the Autumn frost.

Saturday, September 21, 2019

Sweet Saturday morning scene in my kitchen...

The taste of Autumn officially arrived in my kitchen this morning...
... in the form of Harvest Oatmeal for my boy!  

Find the recipe HERE.

Wednesday, March 6, 2019

Home Tip: What does snow melting on my roof really mean?

One of the biggest perks of being a Realtor is the privilege to attend dozens of building inspections per year!  It is a continued source of learning and knowledge for me. The beauty of my blog? The ability to share the little nuggets of home wisdom that I pick up along the way!

Needless to say, it has been a wild and wicked winter here in St. Louis!  Snow days have been aplenty and almost ALL of my inspections thus far in 2019 have been in the snow, including yesterday's.   As we approached the property yesterday, before even entering, the inspector blurted out "Alert Carrie- we need insulation!".

How did he know that, you may ask, before even entering the property?  On the north-facing entry of the home, despite frigid temperatures, the snow was melting off the bulk of the roof EXCEPT above the unheated garage.  Hence, heated air is escaping in to the attic and warming the roof.


Insulation has already been a topic that I have blogged about this year, as we recently did some MAJOR addressing of deficiency in our own home.  While as a real estate professional I should advise it is prudent and due-diligence to climb a ladder and regularly check your insulation levels, realistically, most people only venture in to their attic if necessary.  Hence why this tip is INVALUABLE to Homeowners as it is easy and fool-proof!

Plain and simple, a snow-covered roof means that your attic is doing its job. Patches of uneven melt are a sign of heat loss. If your neighbor's roof has a thick blanket and yours doesn't, it is a sign of heat loss.  Steam coming off the roof on melt days- a sign of heat loss.  Icicles forming on the gutter line are also often a sign of heat loss.  If your roof is warm enough to melt the snow but it's cold enough outside for snow to refreeze, your roof is losing heat.  Period.

HOMEOWNER TIP: 
In the days that follow a snowfall, examine the roof on your home- preferably the North-facing side. If the outside temperature stays below 32 degrees, there should still be a healthy sheet of snow on your roof. If you notice patches where the snow is melting (or any of the signs mentioned above), your attic is likely lacking proper insulation OR the insulation has been shifted during home repairs and is no longer evenly blanketing the attic floor. These areas of leakage will not only melt the snow, but it will cause your heating bills to rise and affect your home comfort.

Address the problem now so your pocketbook and furnace don't have to work so hard! You will be cooler in the summer and warmer in the winter.

LOCALS:

Curious about the cost of adding additional insulation in St. Louis?  In our personal project, we blew in insulation to a maximum R60 level (from 21ish) using premium 85% Recycled Green Fiber, which also creates a sound barrier and is fire retardant with zero fiberglass.  For just under 2000sqft, it was approximately $2,500.  In just 2 months, we have already seen our heating bill drop tremendously, despite frigid temperatures.

Tuesday, February 26, 2019

Just for Fun: 60 and Sunny!

The perfect day to sneak in some mid-day trail time at Castlewood State Park with my girl.

Tuesday, January 22, 2019

Overcast Scene Downtown

Hello, Tuesday...

...Good morning, St. Louis! ❤️ Storm skies as the Gateway Arch peeks over the shoulder of the Old Cathedral (aka the 1st cathedral west of the Mississippi, circa 1834).

Friday, November 16, 2018

Check your sump pump today, St. Louis!

TIP: A high of almost 50 is expected today, St. Louis, which will result in an insanely fast saturation of the soil around your foundation!

To avoid a basement flood, check your downspout extensions this AM & your sump regularly throughout the day to ensure it is running and properly discharging. ❄️💦

Friday, October 12, 2018

Got chills, St. Louis? Check Your Insulation!

Got the chills, St. Louis?  Slippers, warm coffee, and a steamy shower this morning!  Just 3 days ago, The Nenonens hiked (and waded) our way 5 miles through Castlewood.  In fact, we managed to hike 20+ miles over the past week thanks to lovely 80-90 degree temperatures!


Yesterday, however, in true Midwest fashion...
...Mama Nature surprised us all by taking a tumble in to brisk autumnal temperatures, abruptly ending the unseasonable Fall warm streak we have enjoyed thus far.

I have always said that my blog mimics my life, and this post is no different.  My goal here on CDN and the City is to yes, share my adventures but also educate the public on matters of the home.  Often times, that means learning from my mistakes.

I pose a question to you, friends: When was the last time that you peeked in to your attic and checked the level of the insulation?  Answer honestly, judgement-free zone here. 

Apparently in Casa de Nenonen, it has been too long! Way too long, if ever, since closing on our house.  Let's face it: Life is busy.  Homeowners tend to deal with what is directly in front of them: the garage door that needs adjusting, the lawn that needs mowing, the laundry and dishes and messy kitchen floor.  The mundane daily Homeowner tasks, sprinkled with the occasional crisis or voluntary weekend project, keeps us busy!  Am I right?

If you follow me on Instagram, you know that we are currently under kitchen renovation...

In fact, a full gut! When our contractor descended from our attic this week after installing our new recessed lighting, he urged us to add more attic insulation ASAP.  Truthfully, Steve and I rarely even open the attic hatch in this house, as we have plentiful basement storage and it simply is not easily accessible.  

When I popped my head up there this week, however, I was horrified. I have been through enough career building inspections to know the importance of insulation.  I understand R-value.  Yet, I popped my head up in my own attic this week to find this...
Yep.  I am trying not to turn this in to an ashamed Homeowner confession post, but I have no excuse.  To the average person, this photo may mean little to nothing.  To put things in to perspective for you, however, this is the reality thanks to Energy Star...
Insulation's resistance to conductive heat flow is measured in terms of its thermal resistance or "R-value".  Kindergarten terms: the higher the R-value, the greater the insulating effectiveness. The R-value depends on the type of insulation, its thickness, and its density.  Over time, insulation shifts or compacts and becomes less effective.   In fact, when insulation compacts, it acts more as a conductor than an insulator.

Our attic, MAYBE, is R-21 right now.  Again, no excuses people. Most local insulation companies recommend an R-49. The US Department of Energy recommends between R-38 and R-60 for the St. Louis area.


St. Louis County requires a minimum of R-30 on new construction and industry-wide, but that is considered RIDICULOUSLY and INSANELY low for our extreme Midwest temperatures.

So these are the facts: Beefing up insulation and caulking/sealing air leaks is one of the best ways to improve energy efficiency in your home. It is a simple home project that a Homeowner can do on their own and it can reduce your heating and cooling costs by up to a whopping 30%!

In addition, per Remodeling Magazine, it has one of the best ROIs (return on investment) of all home improvement projects.
In other words, THIS HOME IMPROVEMENT PAYS FOR ITSELF while keeping your family warmer on chilly days like today!  Win/win.

Our contractor has graciously agreed to bring Casa de Nenonen to an R-60 once our project is complete...
While I am thankful that he alerted us to his discovery, we should have done our due-diligence and checked it prior to this renovation.  We should have done our due-diligence and checked it years ago.

Learn from my mistake, friends.  The cost of the project is nominal compared to the money saved.  Before temps plummet any further, walk around your home and pay special attention to these areas...
Your pocketbook will thank you!  

Wednesday, September 26, 2018

September in Forest Park...

Nothings says “Hello, Heaven”...
...like a dreamy 70 degree September day in Forest Park!  This was the perfect day to pencil in some down time to lunch at The Boathouse and get our 10K steps enjoying the heart of the city at it's best. 🍂😍

Saturday, September 8, 2018

In The Kitchen: Harvest Oatmeal recipe

Rain, glorious rain brought lovely Fall temperatures to St. Louis over the last 24 hours.  High of 66 today! As soon as the weather begins to turn, Casa de Nenonen goes into full-on Autumn mode.  Apple season is underway and gorgeous produce has flooded local orchards and markets recently, inspiring a return of one of my favorite breakfast recipes.  Harvest Oatmeal is simple and quick, yet delicious... this recipe is the perfect hearty start to a cooler September day!

🍁 Harvest Oatmea🍁
(serves 4)
1.5 cup apple cider
1/2 cup water
1 cup old fashioned oatmeal (not the quick cook)
1 large apple (or 2 small)- diced (I leave the skin on)
1/4 cup of pecans 
Teaspoon of Pumpkin Pie Spice
1/2 Teaspoon of Cinnamon
Tablespoon of Brown Sugar
Dash of Salt 

Bring cider, salt, water, brown sugar, spices, and diced apples to a boil on high.

Bring heat down to medium high and add oatmeal, stirring occasionally.  Cook for 5 minutes, remove from heat, add pecans, stir, and let sit for 5 minutes. Sprinkle with cinnamon or cinnamon sugar and serve.

NOTE: Oatmeal will thicken as it cools, so if "watery" upon removing from heat, do not fret.

------> See other Nenonen recipes HERE.

Thursday, July 12, 2018

Pool day in 63049- Coming Soon!

On some days, it is cruel and unusual punishment prepping a new listing... 


It is 92 degrees in St. Louis and the crystal blue water of this amazing subdivision pool is screaming “Carrie- come hither!!” Alas, I must work.😎  A new listing hits the MLS on Palomino Path in 63049 this weekend. Stay tuned! 4 bedroom, 2.5 bathrooms, every room is Pinterest and Instagram-worthy (click this link for a peek at the cool reclaimed barn wood accent wall). 

You could be bobbing in this pool long before Labor Day, St. Louis! 👙

Sunday, April 22, 2018

Hummingbirds have been spotted in St. Louis...

If you fill it, they will come...
I know that it is chilly outside, but it is time to clean and fill your feeders, St. Louis!  Sightings have happened in our area already, despite the inconsistent temperatures we have had this Spring...
Did you know that hummingbirds have the fastest metabolism of any animal on the planet, burning between 1-2x their body weight in food every day?  As a result, they feed constantly.  I am a huge proponent for making your own nectar.  Just make sure feeders are well cleaned (NO DETERGENT, just scrubbing with water) and changed regularly!

Hummingbird Nectar Recipe:

For 2 feeders, I boil 2 cups of water in a glass measuring cup. Add 1/4 cup of white sugar and stir until dissolved. A basic 4 to 1 ratio is key, no matter how much nectar you make. Let it sit on your counter top until 100% cool and then fill your feeders. I only add a drop of red dye in the beginning of the season until they spot and revisit the feeder. Then, I don't bother.  Change the nectar every 4-5 days. 

NOTE: it can take weeks to get a steady flow of birds to a feeder, so don't give up.

Thursday, September 14, 2017

Just for Fun: Foggy Morning in St. Louis


"It is not the clear-sighted who rule the world. 
Great achievements are accomplished in a blessed, warm fog." 
~ Joseph Conrad

Monday, May 2, 2016

Green grass, green thumb.

The upside to all of this rain?

We have gotten 2 new trees, 3 flowering shrubs, and 2 flats of colorful annuals in the ground at Casa de Nenonen. Our herb garden is started and our ornamental pots and urns are filled with everything from impatiens to fragrant mandevilla.

When Life hands you rain, get your hands dirty!

Tuesday, January 12, 2016

Winter Scene at Creve Coeur Lake...


I cut through Creve Coeur Lake on the way to my office meeting this AM...

It was a winter scene at Dripping Springs. Ice, icy baby!

Friday, September 11, 2015

St. Louis Weekend Happenings: September 11- September 13


Hey, hey St. Louis!  The weekend forecast predicts cool Fall temperatures and our city boasts a calendar packed with family-friendly outdoor events. Three of my favorites this weekend...

Saint Louis Art Fair in Downtown Clayton

Friday:  5-10p
Saturday: 11-10p
Sunday: 11-5p

The Saint Louis Art Fair (SLAF) is a family-friendly and FREE free 3 day celebration of the visual and performing arts, held  in Clayton's central downtown business district. The Art Fair presents fantastic art in numerous mediums, live performances, hands on activities for children, and showcases some of St. Louis' top restaurants. The Art Fair collaborates with over 20 local not-for-profit arts organizations giving them the opportunity to generate earned income and access to over 130,000 potential patrons.

Learn more here:  http://www.culturalfestivals.com/


LouFest 2015

Saturday and Sunday in Forest Park

Loufest returns to Forest Park this weekend for an exciting 6th installment, delivering a weekend of activity, amazing food, and live music including headliners like Umphrey McGhee, Billy Idol, and Ludacris. A peek at last year's fun...


Tickets are required.  Learn more here:  http://www.loufest.com/


Schlafly Art Outside Festival

Friday:  5-10p
Saturday: 10-10p
Sunday: 12-4p 

Schlafly Bottleworks in Maplewood
#7260 Southwest Avenue

Schlafly's Art Outside is a 3 day juried alternative art fair featuring over 50 local artists, live music, and the brewery's finest brews! Hosted at the Maplewood location, this popular event attracts over 15K people each year! 

Learn more here: 
http://schlafly.com/events/calendar/2015/09/11/art-outside


Tuesday, March 31, 2015

Just For Fun: Scenes of early Spring

Spring manages to breathe new life into everything, doesn't it?  As the days get longer and the temperatures begin to soar... sure signs of Spring are blossoming everywhere in Casa de Nenonen and around St. Louis!  A teeny peek...